Our top freebies are exclusive to our newsletter subscribers. Click on the pictures to read more about them, or have both sent to your email by signing up below.
Top freebie!
All Available Free Products
All of the links below link to FREE downloadable products (mostly through Teachers Pay Teachers) that you can use in your music classrooms!
This year my husband and I created interactive staff displays for both our band room and our choir room. Here’s our “how to” blog post for creating this great simple classroom tool.
Interactive Staff Display Step 1
Step One: Print out or make a staff and note heads.
You can buy my printable staff & notes HERE. This includes treble & bass clef and it comes with appropriately sized notes for fitting properly upon the staff. There are 4 different types of note heads included: Boomwhacker colors with letters, Boomwhacker colors without letters, B&W with letters, & B&W without letters.
Print out however pages of staff you want (I usually use three). Trim the edges of the page so the black lines will line up, then tape them together. Cut out the note heads. I would recommend laminating everything to make it all more durable.
OR you can absolutely make a staff and notes out of construction paper or whatever else!
Interactive Staff Display Step 2 – Make it interactive.
Idea One: Magnets If your whiteboard or chalk board is magnetic – OR if you have a large cookie sheet or ANYTHING magnetic in your classroom! I purchase small round magnets from the local department/craft store or here’s an Amazon Affiliate Link to a small bunch.
I use hot glue to attach the magnets to the note heads (you HAVE to laminate them if your using this method!). Tape the staff up against the magnetic surface and you’ll be able to place the note heads anywhere on the staff. This will allow you and/or students to make brief melodies, do some note name quizzes, work on proper note placement – etc!
Idea Two: Hook & Loop Apply hook & loop dots to the note heads & the position you want them placed on the staff. You can purchase these at almost any department store OR – I have had great luck with this budget off brand (Amazon Affiliate Link) – You get a TON of dots for SUPER cheap, and they work exactly like the brand name ones! I use the clear dots ON the staff itself so they are less visible when not labeled, and the white/softer dots on the back of the note heads (so you won’t see the white).
This method will give you less flexibility with the overall display as notes will only be able to be positioned in the places you put the hook & loop on the staff (not anywhere like with the magnets). Maybe that is your goal though, to help students understand where the notes are properly placed! If so – this method should work well for you!
How can I use this in my music classroom?
This can be used for SO MANY things in the music classroom. One of my favorite activities is to do a bell ringer as students are entering the room. I randomly pass out notes to students and before they sit down they have to place their notes in the correct position on the staff. Super simple! Brief composition activities – short note name quizzes – word of the day activities – really anything you can think of!
Hopefully you can find some uses for this in your classroom! Thanks for reading!
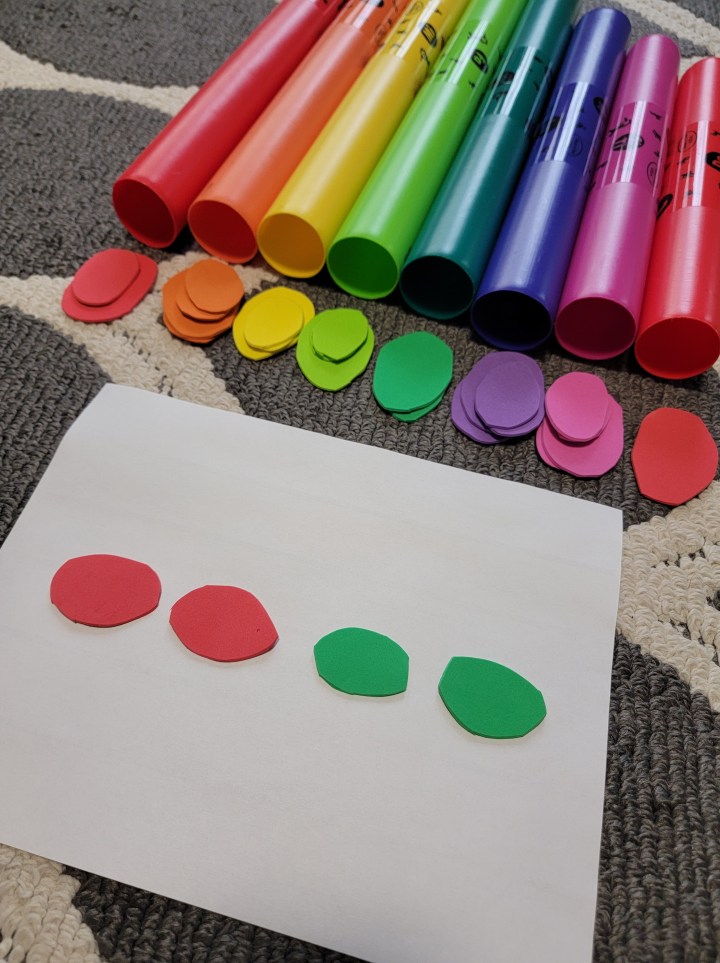
Here’s a really quick way to make some easy, durable, and cheap music note manipulatives. I used craft foam sheets – you can find multicolor packs in most craft aisles or here’s an Amazon Affiliate Link to some to order!
I cut out note shapes out of the foam using the colors as close to Boomwhackers as I could. I only used note heads as my goal for this activity was a VERY basic intro to composition and learning to read lines from left to right. There was no need for stems or flags as I’m not focusing on rhythm concepts at this time. We will do our best to play our songs with a steady beat, however! The notes don’t need to be perfect, and as you can see, mine are a bit rough – but they do the job!
Personally I prefer the foam cut outs because they are more durable, unless you laminate the printed version.
But if you do download this free product, do me a favor and leave us a review on our store if you found it useful!!
Music Note Activities for Early Learners
I use these with my own 3 year old toddlers to do some very basic composition and note reading activities. We take turns picking what color comes next, typically they want to just put them in rainbow order 🤣. Again, my goal for this activity was a VERY basic intro to composition and learning to read lines from left to right. I have varying degrees of success with my three year olds, but I don’t expect a ton from them at this age. This activity can work well for pre-school, kindergarten, and even the first few years of grade school!
Another activity I do with my toddlers is to “write out” a melody they know. So I’ll place the notes in the order of Twinkle Twinkle Little Star, then play it for them and work on melody recognition.
Other good songs to do: Row Row Row Your Boat, Mary Had a Little Lamb, This Old Man, etc.!
Thanks for reading!
I hope this can be useful in some way to you in your classroom or with your own children! I’m hoping to do some more activities like these in the coming months so if you liked this be sure to follow us on our socials (top and bottom of page) to stay updated. Thanks!!
General music can definitely be challenging. Balancing between teaching music literacy while “keeping it fun” and hoping to retain students for future ensembles is a CONSTANT battle it feels like. It seems like we always want something that will grab their attention and be FUN, but still teach them something valuable and leave them wanting more. One of my go to activities to accomplish this is Chance Music.
With chance music activities in the general music classroom I can:
Let students get as creative as they want. Let students create something as complex as they want. Let students invest as much effort as they want. Let students explore new instruments and sounds. Let students create their own system of notation.
All of these things while having an easy couple of days of teaching. (I personally like to do this at the beginning of a new school year!)
Here’s what I do and what grade levels I’d recommend for each step.
Chance Music in the General Music Classroom Activity Steps
Steps 1 & 2
Step 1: (K-8) Complete a class or group chance composition. I like to use Boomwhackers and dice. I have students assign a Boomwhacker to each color of the die, roll the die, then write the results. I keep it basic and slim – no rhythms, just the pitch of the Boomwhackers. Our Boomwhacker Chance Music Worksheets are available for FREE on TpT! I have the students perform the song(s) they wrote.
Step 2: (2-8) Using these songs we just wrote – I ask the students, “What makes these different from typical songs?” Ideally I’m looking for someone to mention things like just pitch, no specific rhythm, no lyrics, single sounds, etc. From here I will ask the students how we can add something like rhythm to this song. There are a LOT of ways you can go here – this is just what I do when my class doesn’t take me down a different creative path. We’ll work together as a class to use the same method of randomization (rolling dice) to assign a rhythm to each pitch. Check out our rhythm dice we handmake! Or with standard dice – Do something as basic as a 1 is a quarter note, 2 is a half note, etc. Students roll through their songs again, this time notating rhythms WITH the pitches. Perform the song(s) again!
Step 3
Step 3: (4-8) Here is where we can get into some REAL creativity. I like to show this video. Then, I have the students work through some simple questions on a worksheet (FREE download available HERE). It’s healthy to have a class discussion and work through answers to the questions on the worksheet (listed below with my answer goals).
Chance Music Starting Questions
What is chance music?Music that has been created by leaving some or all aspects completely up to chance or methods of randomization. What aspects of music can be left to chance?Pitch, Rhythm, Dynamics, Timbre, Instrumentation, Meter, Phrasing – etc. (basically ANYTHING) What are some methods of randomization?Rolling dice, drawing a card, flipping a coin, wheel spinner, drawing straws, etc. (Amazon affiliate links) What is a notation system?A method of keeping track of information so another individual can understand it. (more on this later!)
Then I ask the students to: “Create a chance composition using any notation system you desire. Write down whatever is required to correctly perform your song on separate paper(s). Be specific! Make sure someone else could look at your song, understand it, and perform it without being able to ask you questions.”
Before you turn them loose – have a serious talk about your expectations of a notation system. I put zero limitations on this (which can present challenges) – it can be as simple or complex as they want. I expect to see things that are literally just letters on a piece of paper, maybe a line of different colors, sometimes I have students use full music notation and even put their composition in with notation software – it really can be whatever they want. BUT – I have to be able to understand how to perform their song JUST by looking at their notation system. If that means there is a key of to the side where a red block means this and a blue block means this – that’s fine! It HAS to be on the paper. Not worrying about a specific notation system frees those students who don’t have a good grasp of music notation to be creative. Okay, ready?
Prepare for creative chaos!
I open up the room and tell the students to get creative. I provide dice, cards, and coins for students to use (or let them create something on their own for randomization). I let the students use the classroom instruments, their OWN band instruments (if they are in band), and whatever else they can think of to create music (within reason of course.) Give the students time to work as long as you feel they are being productive (I usually give them about 2 periods of 45 minutes to compose their song.) Then have them perform the piece for the class – using friends if need be to cover other parts!
What about the “I’m done!” crowd? -Wow your song is four notes and that’s it? Okay, how about we roll a die for each of those notes and see how many times you are going to play that note. Then flip a coin to see if it repeats or not!
This activity is less about the final product and more about the complete process underwent.
I absolutely stress this statement to my students. Sometimes the songs sound cool and fun – sometimes they sound like nonsense. It’s about what you put into it. There are no wrong answers with this activity!
PROCESS NOT PRODUCT!!
My Favorite Student Creations:
I have had an entire composition that could be played on a single chair using a pencil – and it was actually really cool! They flipped a coin numerous times to see if they were supposed to hit the seat or the back (which each had different sounds). Then I pushed them to take it a step further and see if they could find a method to add dynamics by chance.
My personal favorite was a student who created a 12 by 12 grid of color blocks. Each color meant a different instrument was supposed to play an unspecified pitch. He had 3 friends perform with him. But what I LOVED about this was before his performance he asked me to pick a number between 1 and 4. Whichever number I said was the direction he rotated his grid and that was the direction of how the song was played through. So he basically was able to write 4 songs in one simply by rotating his piece of paper.
I had a student who randomized EVERY possible aspect he could and put his composition into Noteflight (music notation software). He rolled a die to see how many measures, flipped a coin to see what time signature, drew cards to see what pitch, flip a coin for what dynamic, rolled a die to determine what rhythm, etc. The end result sounded ….. pretty outlandish – but I absolutely LOVED the creativity and initiative he showed in his work.
Give it a try!
Well … that was a rather lengthy post! I hope this at the very least gave you some ideas to help conquer the beast that is general music class! This definitely seems like a daunting process, and it is! But it can be such a fun and rewarding activity to do with students I really recommend giving something like this a try!
Here are some other great resources for general music classrooms!
We’re laying this out based on 5 different situations, so read through to see which one most closely resembles your own. Please also know that we have the most experience with Google Classroom and are working from our experience with it. Other LMSs (Learning Management Systems) are fully capable of making things happen but it will take adjusting. We cannot possibly cover every detail required to make things work for every LMS and situation. You can certainly Contact Us. We are willing to help out in anyway we can, but please be understanding if we cannot answer all of your questions!
Music Distance Learning through Synchronous Instruction (live teaching through video conferencing)
Video Conference Class & Student access through LMS If you are teaching live via video – almost all of the most common services offer a share screen option. You can simply have your screen share be the presentation and take the students through it almost like a normal classroom! Send students the Digital Guided Notes through your LMS. Make sure you get each student their OWN copy of the guided notes (you don’t want everyone trying to make edits to your original document!) – In Google Classroom be sure to change the settings to “Make a copy for each student” when you create the assignment VIDEO GUIDE. For other systems you can send them the link to the Digital Guided Notes but change it to make what’s called a “Force Copy Link” VIDEO GUIDE.
Video Conference Class & No LMS In Place If you are teaching live via video but do not have an LMS in place, do everything from the paragraph above as far as video conference screen sharing, BUT – To get the guided notes to the students you can either send home a printed packet for them to write on, or email the students a copy of the Digital Guided Notes. There are a few ways you can email these to students: As a PowerPoint File – Anytime you download Google Slides out of Google Drive they convert to a PowerPoint file. VIDEO GUIDE Force Copy Google Slides – Create a force copy link for students to each get their OWN copy of the Guided Notes Google Slides files in their Google Drives. Do this by creating a force copy link and sending it to students. VIDEO GUIDE After the students complete the notes, they can email them back to you.
Music Distance Learning through Asynchronous Instruction (teacher assigns, student works at own pace)
Fully Digital – Full student access through LMS? Send the Presentation & Digital Guided Notes to students through your LMS as an assignment. You need each student to get their OWN copy of the guided notes. In Google Classroom be sure to change the settings to “Make a copy for each student” VIDEO GUIDE. For other systems you can send them the link to the Digital Guided Notes but change it to make what’s called a “Force Copy Link” VIDEO GUIDE. You will also need to send the students a link to the presentation so they can view it on their own. VIDEO GUIDE It is important to change the sharing settings so they cannot just copy and paste the presentation into the Digital Guided Notes– this is covered in the previous VIDEO GUIDE. In this situation students will have the presentation AND the digital guided notes open at the same time. They can go back and forth between them or have one window open on one side of the screen and the other window open on the other side of the screen (I even had a student use her phone as a second screen). They will not get all of your extra tidbits you can add during a live presentation, but they can still read the information and watch the videos. One afterthought – Instead of sending the students the presentation, you could record yourself GIVING the presentation and send that video to students instead! You could use screen capture software like Screencastify or ScreencastOmatic so students could properly see the presentation information and hear your recorded voice.
Sending packets home & home has internet? Print the PDF guided notes to send home, and send the link to VIEW the presentations through your LMS – VIDEO GUIDE. If you don’t have an LMS in place – you can send home a list of short links VIDEO GUIDE for students to easily type into a browser to access the presentations. Students read through the presentations online and fill in blanks of printed guided notes.
Sending packets home & home has no internet? One option is to print the PDF guided notes AND print the Google Slides presentations out for students to take home. Students read through printed presentations and fill in blanks of printed guided notes. This is probably not ideal for this particular product as students would be unable to view the YouTube videos, but if you have a situation where only one or two students in your class don’t have internet and the rest do, it would suffice.
We’ve put together a list of materials that we’ve created and/or can be used for E-Learning/Distance Learning/Remote Teaching. This post is being updated as we create new content – to receive updates when we add new products – sign up for our newsletter below!!
Updates to our Music Distance Learning Products
Theory Experts: Music Theory Curriculum – Printable PDFs and Digital Interactive Google Slides. This curriculum was designed to work in person and for distance learning. We have created 3 different levels to work for all ages K-12, you can purchase them as a bundle or individually as you need. Each lesson contains instructions and guides on the page for students to be able to learn on their own or with a parent’s help. We have ALSO created video lessons that directly accompany the lessons. View the YouTube playlist HERE.
Music From a Distance – A completely no prep packet for shorter term distance learning that can be used on Google Slides, TpT Easel or printed and sent home. Also includes several samples of our other products that work for distance learning.
We are giving away 16 FREE Listening Journals that use a variety of music, are ready for distance learning, are self-grading, and are done via Google Forms. You can’t go wrong with free things right? Find out more info in our new blog post SELF-GRADING LISTENING ACTIVITIES WITH GOOGLE FORMS.
I highly encourage everyone to take a look at my Noteflight Mystery Song Assignment Blog Post – This is a great FREE activity that teaches students about chord progressions, creating a bass line, etc. – It also helps them learn how to use notation software! From there, if you want to continue along this path, I recommending looking into my Mystery Song Bundle.
A one week safety net review plan mostly using MusicTheory.net This incorporates perfectly into Google Classroom with people dealing with a 1-1 computer situation. You can literally copy and paste the information directly out of this and make assignments in Google Classroom! View the Google Doc Unit Plan here.
We have three completely independent sing-along and activity books that could be sent home with students. All of the products come with sheet music, color by music pages, and other activities to keep students learning about music from home. Can You Count? is a song about learning the value of whole notes, half notes, quarter notes, and 8th notes . Name the Notes is a song about about learning the lines and spaces of the treble clef. Old Blue is a fun song about living with a faithful dog. These are great send home packets for elementary students. Each product also has a sing-along video hosted on Raonna Studio’s YouTube (linked below).
You can customize them however you would like in the top right corner.
I give the students 5 minutes to get as many correct answers as possible. We make a loop around the classroom and students go up to the screen, select the answer, then move along the loop. This can also be a great break when students need to move a little bit. BUT it is still reinforcing concepts!
If management becomes an issue, I simply bring a halt to the loop movement but the timer continues!
I have each grade do an exercise that is appropriate for their level. For these scores, my Kindergartners, 1st graders, and 2nd graders did ONLY the treble clef notes. 3rd and up did the entire grand staff! As you can see, third grade is a little slow – but they are accurate! 7th grade is currently leading the challenge. You can really use any sort of quick paced review activity for this challenge!
This is just a great activity to promote a little healthy competition among my classes. I will say, that my high school choir does not do this very often, so please don’t judge me for their lower score! As you can see, they don’t even have a regular spot on the board! We’ve been swamped with contests this time of year, so they rarely get to do the 5 Minute Challenge. Also – Kindergarten is on the bottom because they originally weren’t in the competition, later when they started learning the notes of the treble clef (yes, they CAN do it!) they joined.
I keep track of my scores on the white board.
Creating the tracker for The 5 Minute Challenge Music Classroom Activity
Your tracker can be as simple as you want – you don’t even need to track if you don’t want to! I personally think a little healthy competition can be a good thing! All of the materials I used to create my tracker can be found easily at your local dollar store or craft store. I have provided some links to Amazon resources if that works easier for you! These are affiliate links so I will receive a small bonus if you buy through them!
I created the chart on the main whiteboard in my classroom using painters tape. I used a foam sheet to create the arrow marking the current leaders, and hot glued a small craft magnet on it so it’s easily movable.
This is a great activity to give students a break from whatever you’re doing. It gets the moving but they are still LEARNING and/or reviewing in the process! Here’s some other fun activities for music classrooms! Including my FREE dynamics posters shown in the picture above!
I have a bit of a unique classroom – it is half of what used to be one HUGE room. A few years before me, teacher situations changed. They took the music room, cut it in half and made separate band and choir rooms. So, to get to my choir room, you actually have to walk through the band room – it’s a little different but it works! Also, when I took these pictures we were prepping for a concert, so I had risers out in my room. Typically I have chairs set out in rows. But here is my classroom!
Music Classroom Tour Continued
I love my back wall! My mother-in-law let me borrow her Cricut a few summers ago. I cut out a ton of music notes. Several of them didn’t survive the first year, but the ones that are still up have been on the wall for about 2 years now – not bad! I also love my Boomwhacker storage (velcro on the wall, small strip of velcro on each boomwhacker – works great).
Here is the front of my classroom. This is where I spend quite a bit of time (the piano, the Smart Board, etc.) You can also see our tubanos which we just got this year through a big Donor’s Choose project! I leave the left side of my board dedicated to keeping track of our 5 Minute Challenge Scores (read more about that here!) On the left side of my white board is my dynamics display. These are great to have front and center in the room to help forgetful students. Purchase them from my Teachers Pay Teacher’s Store HERE!
More Music Classroom Tour
Up next is one of my students’ favorite parts of my room – Dave, the minion! I drew the minion and colored him in by hand (much cheaper than a big print). This is another Pinterest find!
This isn’t the prettiest part of my room – but it is definitely practical. Here is the obligatory folder rack. I get so much space and function out of this beast! Choir folders, microphones for jazz choir (keeps them organized and protected), and my elementary folders. Each class has a color folder (K=Red, 1st=Orange, etc.). Each student has a folder with a number. When my students need to get their folder they go to their slot number and find their color folder. So each slot will have 5-6 different colored folders in it. It let’s them find their folders quickly without taking up a ton of space!
I can’t remember where I came up with this next idea – maybe it’s my idea originally – who knows! On the back of my door I keep all of these little signs to tell my students what they need to bring when the come in to the classroom. I put the signs I need on the opposite side of the door, they take a look and grab what they need for class without me having to say a word. Works like a charm! I now just use a whiteboard and write what the students need to grab when they come in the room!
We have all seen the “NOISE” post on Pinterest (when the students are making noise – they lose a letter). I’ve taken that and combined it with a behavior chart! I call it “Grand Behavior”. It’s perfect because it also teaches the students about the grand staff!
When a class is misbehaving, or their behavior isn’t “grand” – they lose a letter at the whiteboard (bottom picture). If later they show me behavior that is “grand” they can earn a letter back. At the end of class time, if they still have all of their letters they have had “Grand Behavior” and they get to move up a spot on the grand staff. I have them all start at the lowest line of the bass clef. When they get to Middle C, they earn an incentive (center day, treat, game). When they get to the top F of the treble clef, they also earn an incentive (similar). After that, they have to start all the way back down at the bass clef. I usually get a little healthy competition among the classes!
Removing a letter from the whiteboard is a huge visual that all students notice without you having to use your voice. As music teachers – we all know our voice is precious!
Creating this music classroom management tool.
All of the materials to create this can be found easily at your local dollar store or craft store. I have provided some links to Amazon resources if that works easier for you! These are affiliate links so I will receive a small bonus if you buy through them!
I created the chart using a whiteboard, painters tape, colored foam sheets, small craft magnets, and wooden letters. The foam sheets make very durable items. I attached magnets on the back with hot glue. These have lasted 2+ years. I spray painted the letters black , and hot glued magnets to the back of them.
This is a wonderfully simple visual cue for classroom management that I found to be a very effective tool for elementary music classrooms! Here are some other great resources for elementary music classrooms!
American Folk Songs for the Modern Classroom A collection of 20 folk songs and sing-along audio files to be used in any classroom.
Hello readers! I received a grant from the Mary Chilton DAR (Daughters of the American Revolution) Foundation to create a songbook of folk songs to be used in the modern classroom. American Folk Music is an integral part to America’s culture and heritage. Sadly, many of these songs are no longer being taught as they are seen as “too old,” or “not standards aligned.” These songs are a huge part of our culture and used constantly within other compositions. Students are missing out on the experience of them simply because they do not know them!