To see the end result that students will be creating before reading this lengthy post, click here!
To read part 2, where students write their own song, click here!
This lesson plan is COMPLETELY FREE to use – however to build from here, I recommend purchasing my Mystery Song Bundle from my TeachersPayTeachers store to continue this project after the initial step.
To get started on this lesson plan, all students will need a computer (or tablet, though this was done on a computer), a Noteflight account (FREE, info below), and a copy of this PDF “Mystery Song Part 1”.
Have students sign up for a FREE account at Noteflight.com.
Students will need to enter an email address, verify that email address within the email, and then they will be able to create a username and password.
OR – Check out Noteflight Learn – the cost is very reasonable, and the added features you receive are definitely worth it! Free accounts will work absolutely fine for this project.
From your Noteflight home page, click on  in the upper right hand corner.

Select “start from a blank score sheet” and click OK. 
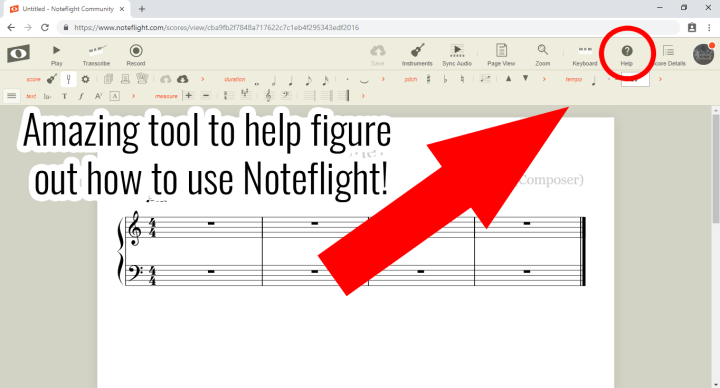
This is not a guide on how to USE the notation features of Noteflight. I encourage you to mess around with it on your own to get yourself used to it. To me, the software can feel a little backwards at first use, but after you get used to it – it’s very simple. Students will be a little confused and frustrated at first as well! Noteflight has amazing help resources available as well. Just search for what you’re trying to figure out how to do!
From this point forward this guide will assume you have associated yourself with the basic features of Noteflight. Again – if you can’t figure something out, use the search function!
For now, remove the bass clef, so you only have treble clef remaining.
(Click on the bass clef and hit “backspace” on your keyboard)
We’re ready to begin Part 1!

Song Writing PART 1
Pass out “Mystery Song Part 1” to students. Have them go through the steps listed.
This is also a great first assignment to get students associated with the basic features of Noteflight!!
When they have completed the steps listed on the linked PDF, their score should look like this. Again – this first part will probably take time for those new to Noteflight. It may take several class days JUST to get to this point – that’s fine!

Your students have probably figured out the song is BINGO at this point, so we can go ahead and give them the lyrics to add in, and they can title their song. Use this PDF with Lyrics to show them where the lyrics fall and have them add them to their score (or if you prefer you can start with this PDF instead). Now our scores should look like below:

Song WritingPART 2
Now that we have completed part 1, we are ready to move on to part 2. Part 2 will involve adding a bass line to accompany our melody. Referring to our “Mystery Song Part 1” sheet, remember those letters above the music that we ignored the first time? This is where they come in to play! I added them into my score – you do not need to, as the students can glance back at their original sheet to see.
From this point forward I recommend working in “Strip View” mode – it’s easier to manage, in my opinion. Click on “Page View” in the top right and then select “Strip View”.
The first thing we need to do is add a bass instrument. Click on “Instruments”. This will open a side menu, then click “Add Instrument” within it. Click on “Plucked Strings,” and then select “Electric Bass.”

From here, I explain it to the students as, “We are going to add the written in pitches in a rhythmic pattern.” For example, the first note we need in the accompaniment is D. So the first pitch we add to the bass line will be a D. Any rhythmic pattern is fine, but use mine if you choose. I chose 2 eighth notes and a quarter note. You don’t need to add anything to the pick-up measure (but feel free).

We have the first measure done. Now what? There isn’t a letter above the next measure! We are going to continue using the previous letter until we see a new one. So the next measure will be the exact same!

Now that we have a new letter, we are going to use that pitch instead of D. So G! Still using the same rhythmic pattern. We will continue this way until the entire bass line is full. When you get to the “Bm” – just ignore the “m” for now and place a B. If you understand how chords work – you’ll see that this is no sweat!

Now that the bass line is finished – give it a listen. It’s starting to sound like an accompaniment!
Song Writing PART 3
Our next step is to add chords to our accompaniment. Don’t sweat if you or your students aren’t a master at chords! I explain it to my students in a very simple way to build the appropriate chords needed (for simple songs like this one).
First step is to add another instrument (follow steps in part 2) but this time let’s add a “Guitar” (under Plucked Strings).

We are going to continue using those letters above the melody line, just as we did with the bass line. But this time we are adding even more than just a single note.
The first note that needs placed is the given letter (so again, D).

Then we are going to stack 2 notes on top of it. I explain it to students as if it’s on a line, stack the next 2 lines. If it’s in a space, stack the next 2 spaces.

Again we will be doing this in a rhythmic pattern. I chose dotted quarter eighth note.

Continue to enter the chords in exactly like the bass line. If it’s a new note – start there and stack. Keep the rhythmic pattern going throughout the guitar line.

Give it a listen!
Song Writing PART 4
Now for the fun part – adding drums! Once again – add another instrument, this time “Unpitched Percussion” and “Drums (Standard)”.

Drums are a different staff, with each line/space creating a different drum set sound. Again – we are going to create a rhythmic pattern.

And we are going to take that pattern through the entirety of the song (no need to change for different letters).
If you haven’t learned how to copy and paste measures yet – now would be a good time! It works the same as it does in just about any other piece of software.

Give it a listen!
I realize that accompaniment instruments do not play the exact same thing for the entire time they are accompanying a song – this is just a starting point and a learning tool! From here I often have students add an ending, drum fills, etc.
This is just the first attempt at a project like this. After this I typically have students take on a larger scale song. Sometimes I will step them through the steps again – other times I will give them a new mystery song and say GO!
You can purchase my “Mystery Song” bundle from my Teachers Pay Teachers store by clicking HERE! This will give you 12 songs that work great for this activity. Plus you get the added bonus of them having to listen to the melody to discover what the song is!
After doing some additional songs in this format, I have students work towards writing their own song. I cover this in Part 2 on this blog, view it here!
I hope you found this guide useful – I apologize if it was confusing, I did try my best to keep it clear and concise without getting overwhelmingly lengthy!
Good luck!
Sign up for our newsletter to receive updates, freebies, and notifications!